Looking for a quick, easy, and affordable way to spruce up your interior doors? A DIY door trim project checks all the boxes with minimal materials, power tools, and expenses. It’s what you call a win-win-win.
Modernize your home with these interior door trim ideas
My house started with your average run-of-the-mill 1970s flat doors as far as the eye could see. They did the trick, sure, but that was about it. And frankly, my dark and dreary hallway looked like a funhouse full of endless doors with equally no personality. I debated replacing them all in one swoop but went back to ol’ cost analysis audit and decided that money could be better spent elsewhere.
Plus, just as a heads up, it’s somewhat challenging to order new doors for a house abound with imperfect measurements and trim—once you give the store your specifics, you’re stuck with whatever door they come back with, regardless of how it fits—scary stuff.

Picking your perfect DIY door trim design
After perusing Pinterest for inspiration, I decided the most straightforward option would be to add raised panel molding to my flat doors. Creating a 3D shaker door would have been another option but would require more overall work and a lot of precision with measurements. My wonky door dimensions certainly weren’t up for the task. So, that option was out.
To the drawing pad: sketching out your trim on doors
I decided to go with a more conventional three-panel door style for my main interior doors. This fell into the sweet spot between old and new and felt right, given the central part of my house is what I like to call upscale industrial — a throwback to a more classic industrial design but updated.
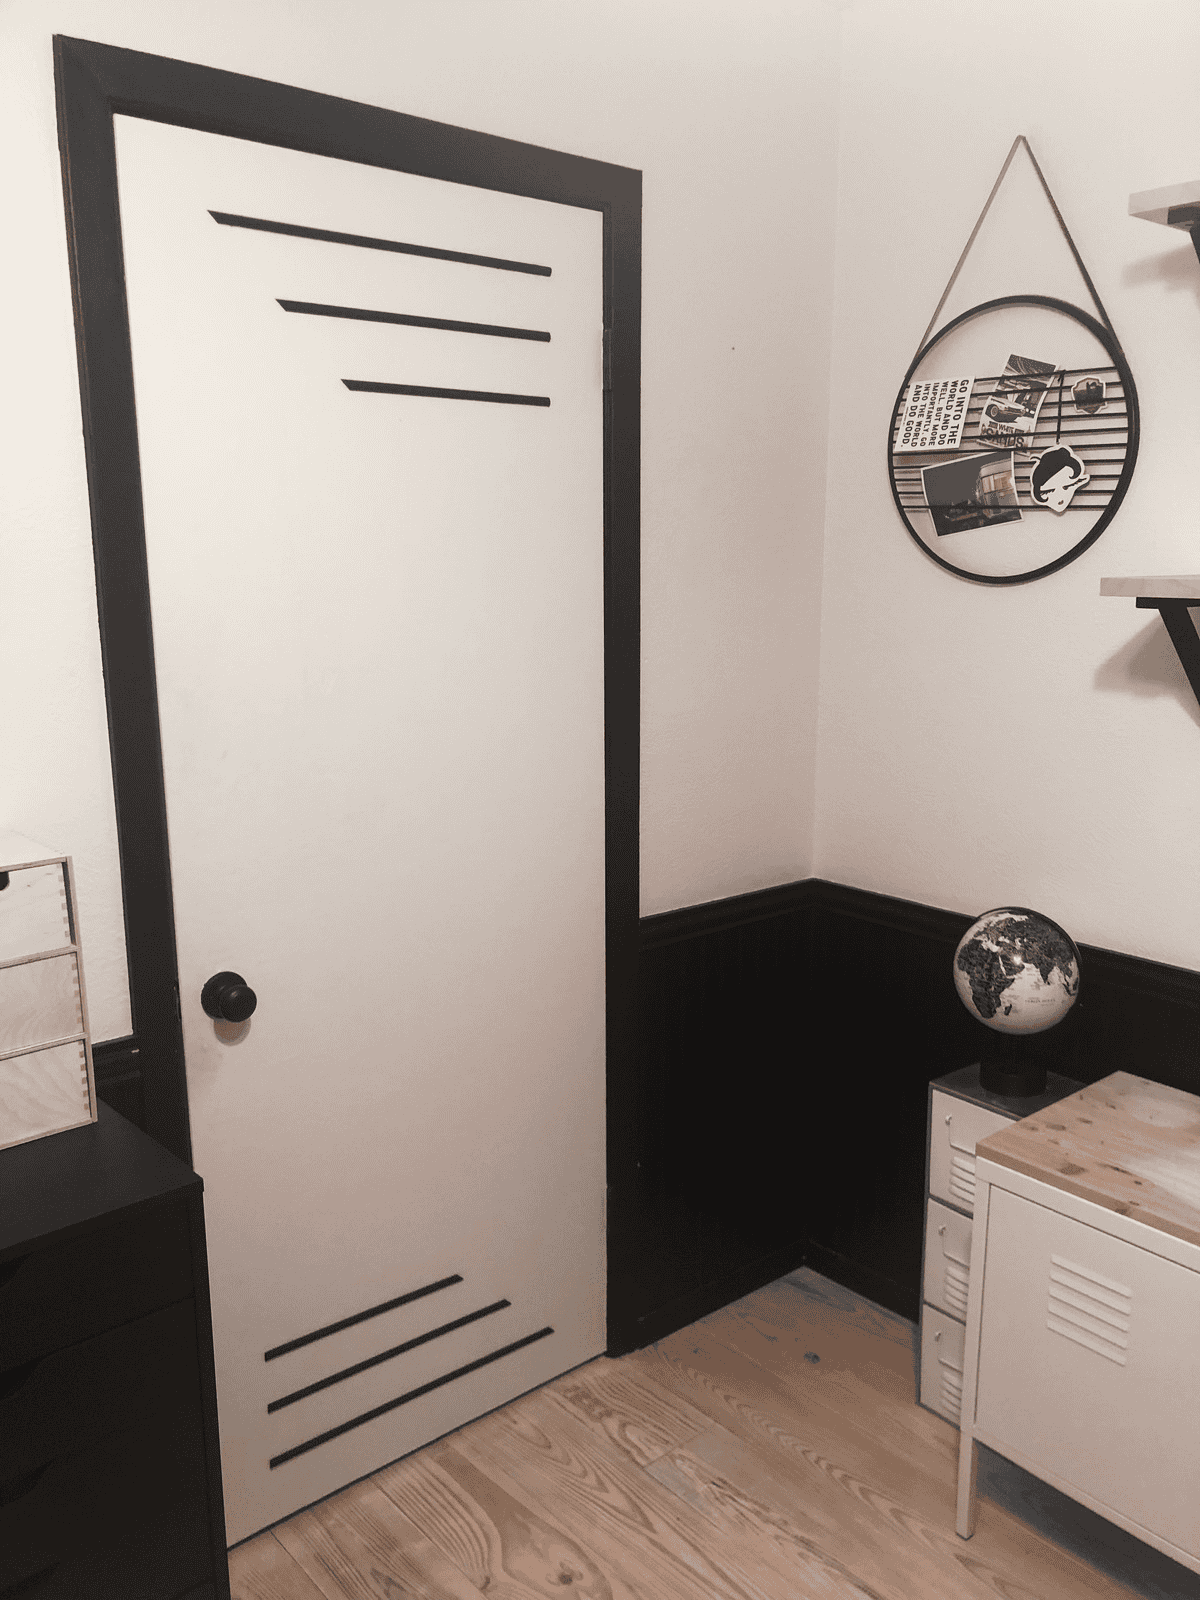
But I thought it would be fun to play around with a more modern door trim pattern for my office, which is done in a Scandinavian black-and-white design. Here’s where I let my imagination run a little wild… well… within the constraints that straight angles will allow. Ultimately, I landed on design “E” from the sketches, and it was off to the races.


Ultimately, there are so many fun designs when it comes to doors. Remodelaholic does a great job capturing this in their article 40+ Ways to Update Flat Doors and Bi-Fold Doors. It’ll seriously leave you so inspired.
Prepping flat doors for adding trim details
Sadly, my doors had been painted over many times over the years and required some preparation if I wanted fresh paint to adhere to such a high-tough surface. That meant… you guessed it… it was time to bust out the sander. (As a reminder, I always suggest testing any old paint before removing it. You can get a lead-based test kit for pretty cheap from your local hardware store.)
I probably was a little more aggressive than need-be with my level of sanding. There were so many layers of paint that I didn’t want an uneven surface on the final product, so I went ahead and removed all the paint. That was by far the most taxing part of this whole project.

Picking out your paint colors
Once I had a smooth surface to work with, I painted the base of my doors and the trim I’d be using. Note: This may not be necessary at this stage if you plan to have the same color trim as the base of the door. In that case, I would wait to paint it all after adding the trim details to the door. In my case, though, I decided to go with a two-tone look. Because I’m a sucker for the maximum amount of work, apparently…
If you’re so bold, I think there’s a major opportunity to have fun with your color choices here—maybe even employ a pop color, especially in particularly dark corners of your house (see my scary “before” hallway pic above). Addicted2Decorating has pulled together some fantastic examples in this super fun Colorful Painted Interior Doors blog post.
Measuring and cutting your trim
When it comes to plotting your layout, I suggest making a pencil grid on top of your door, especially when you’re working with doors that aren’t perfectly square. Otherwise, you could measure your perfect dimensions in theory, but they’d look very awkward in practice. I did an essential measurement from the top and bottom of the door and then decided how much space I wanted between each trim element. However, I did make sure the distance between each piece or element and the top or bottom of the door was equidistant.
Once my grid determined the lengths of each piece, it was time to move on to cutting the trim. The key to any successful trim project is to get your angled cuts down. I went the manual route: I used a basic mitre box for all my cuts. I like this approach because I could sit right next to the door, measure, check, double-check, and cut—all in one swoop.
For a panel design, you’ll want to cut each corner at a 45-degree angle so that they adjoin nicely and cleanly (otherwise, each piece would stack on top of each other and look pretty weird). Because you’re cutting at an angle, you’ll need to make sure the longest side works with your measurements and fits nicely with the longest side of the adjoining piece. You can see more on this technique in this helpful How to Cut Trim video from Ace Hardware:
Adding the trim to the flat doors, aka dressing ’em up!
With my cuts complete, I was ready to apply the trim to the door and bring my door pattern sketches to life. I used strong wood glue since each trim piece was pretty light. The only thing complication was my doors were still on the hinges and sitting vertically. So, to keep the trim in place, I employed some handy dandy painter’s tape while the pieces dried. In general, I wanted to avoid going the nail/nail gun route and having to fill in the holes. Plus, my trim was pretty thin and might crack if I went that route.


I let the trim dry like this overnight and checked it the next day. Luckily, it was all nice and secure, and the tape was ready to come off. Other than a few paint touch-ups where I made my cuts, my newly updated doors were ready for their big reveal! All in all, I am pretty happy with the finished product: another small detail that helps tie in a fluid linear look throughout my overall home design.


Shop the looks!

Like what you see? Here are some items inspired by the project to help you dress up your interior doors in no time.(Please note: As an Amazon Associate, I earn from qualifying purchases, at no additional charge to you.)


